SolisStorage Battery Protocol Firmware Upgrade
Purpose
This article provides installers with a standardized procedure upgrading firmware, verifying software versions for SolisStorage Battery Protocol using the Solis 2nd-Generation One-Click Upgrade Dongle (MS-S2-UPG).
Video Reference: Solis Europe Youtube Channel
SolisCloud: Inverter Firmware Upgrade Guide
Required Tools and Materials
- Solis 2nd-Generation Upgrade Dongle (MS-S2-UPG)
- S2-WL-ST Data Logger
- USB Flash Drive(s)
- AC Wiring Cables
- DC Positive and Negative Connectors
- Anti-static Gloves
- T10 Screwdriver or Electric Screwdriver
1. Power-Up and Firmware Upgrade Procedure
1.1 Prepare Power Connections
Option A – DC Power Supply
- Connect pre-crimped DC connectors to the inverter PV+ and PV− ports.
- Supply DC voltage between 180V and 600V.
- Recommended test voltage: approximately 200V DC.
- Turn the inverter DC switch to ON.
Option B – AC Power Supply
- Remove the AC wiring cover using a T10 screwdriver.
- Connect AC cables to the inverter Grid terminals:
- L
- N
- Energize the AC supply.
- Press the Grid Connection Button on the inverter.
1.2 Determine the Correct Firmware
Before upgrading, verify the inverter date and model from the serial number.
If inverter date is before the date mentioned in the overview a Firmware update is needed, when the date is later no update is needed and the inverter already has the new protocol to match the SolisStorage Battery.
Example: 103173A263230227
Date: 2026.10.23 (YYYY_MM_DD)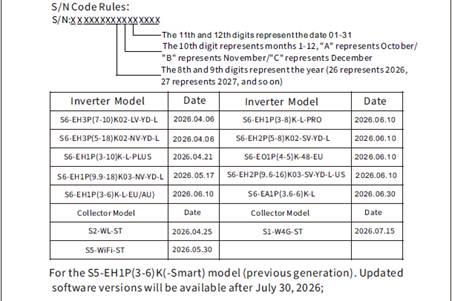
How to Identify the Model
Example: SN: 103173A263230227
The 3rd to 6th digits indicates the model number: 3173
Use this model number to obtain the correct:
- DSP firmware
- HMI firmware
- LCD firmware
Please contact your local Solis After Sales Service by creating a ticket for the firmware request to update the inverter with the SolisStorage Firmware. The following models currently have Firmware available: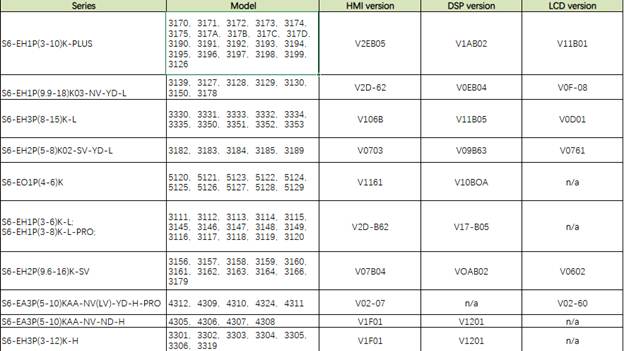
1.3 Prepare the USB Drives
Important Requirements
- Create a folder named: “UPGRADE” on the USB drive if it does not already exist.
- Copy the firmware .bin file into the UPGRADE folder.
- Only one firmware file is allowed per USB drive.
Recommended Setup
Use separate USB drives for:
Firmware Type | USB Drive |
DSP | USB #1 |
HMI (ARM) | USB #2 |
LCD | USB #3 |
1.4 Connect the Upgrade Dongle
- Insert the USB drive into the MS-S2-UPG dongle.
- Connect the dongle to the inverter COM port.
1.5 Select Upgrade Mode
After connecting the dongle:
- The display shows: BEG
- Short press Key B.
- Display changes to: UEH
- Press and hold Key A for 2 seconds.
- Enter the generation selection screen.
- Select: 2-0
1.6 Start the Firmware Upgrade
- Return to the main menu.
- Locate: BEG
- Press and hold Key A for 3 seconds.
- The upgrade process will begin.
The dongle automatically identifies the firmware file and upgrades the inverter.
Supported Firmware Types
- HMI (ARM)
- DSP
- LCD
Upgrade Completion
The display shows a progress bar. When the progress reaches: 100% the upgrade is complete.
2. Verifying Firmware Versions
Inverters with LCD Screens
- Press ENTER twice.
- Press DOWN.
- Review the firmware version information.
- Confirm the displayed version matches the target firmware.
Screenless Inverters (ND)
Use the SolisCloud App and connect locally via Bluetooth.
Requirements
- Log in using an Administrator Account. Do not select: Installer or Owner. This prevents registration conflicts and device ownership issues.
- Local Bluetooth Password: solis#800
Verification Process
- Connect to the inverter via local Bluetooth.
- Open Local Commissioning.
- Read the inverter information.
- Confirm firmware versions have been updated successfully.
3. Upgrading Additional Firmware
Repeat the same procedure separately for:
- ARM / HMI firmware
- DSP firmware
- LCD firmware
Each firmware must be upgraded individually using its corresponding USB drive.
4. Troubleshooting
If an upgrade fails:
- Check the error code displayed on the dongle.
- Refer to the corresponding error description.
- Repeat the upgrade process.
LCD Freeze or Upgrade Lockup
If the inverter or dongle becomes unresponsive:
- Restart the inverter.
- Retry the firmware upgrade.
If the problem persists after multiple attempts:
- Escalate to Technical Support.
See our contact page for local phone number, Whatsapp Channels, Email Adresses or Online Portal Acces